DreadPotato

joined 1 year ago
[โ€“] DreadPotato@sopuli.xyz 2 points 5 months ago* (last edited 5 months ago) (1 children)

Wow yeah that first one is pretty terrible looking ๐Ÿ˜…

I'm decently pleased with mine though, but I'm really looking forward to the quality on the voron. I actually already have "the filter" on my current printer (slightly oddly placed in the tent, but it works), and I just connected it directly to the printer PSU and manually turn it on/off with a toggle switch.

[โ€“] DreadPotato@sopuli.xyz 5 points 5 months ago

Garmin is pretty much gold standard when it comes to sports tracking. Most other brands are a step down, and I imagine a FOSS watch like the bangle.js is a significant step down from Garmin watches WRT sports tracking.

[โ€“] DreadPotato@sopuli.xyz 3 points 5 months ago (1 children)

The solution was more cooling. It was warping due to too much heat, I increased cooling to 100% and reduced overhang speed slightly and it now prints well.

[โ€“] DreadPotato@sopuli.xyz 3 points 5 months ago* (last edited 5 months ago)

Both ASA and ABS are approved materials. ASA has higher heat defection than ABS, should be easier to print and it smells significantly less when printing.

[โ€“] DreadPotato@sopuli.xyz 2 points 5 months ago* (last edited 5 months ago) (1 children)

Fans are completely disabled, except for overhangs and bridges. If I disable fans for overhangs and bridges, they sag like crazy.

I doubt draft shield is going to do anything, the printer is already completely enclosed in a tent. I have around 50-55ยฐC inside the tent.

Edit: I tried a re-print with less cooling for overhangs, it seems to exacerbate the issue significantly.

27
submitted 5 months ago* (last edited 5 months ago) by DreadPotato@sopuli.xyz to c/3dprinting@lemmy.world
 

[SOLVED] cause: not enough cooling for overhangs

I increased cooling on overhangs from 60% to 100%, and decreased overhang (10-25%) speed from 100% of outer wall speed to 85%. Issue went away completely and it now prints nicely ๐Ÿ‘Œ

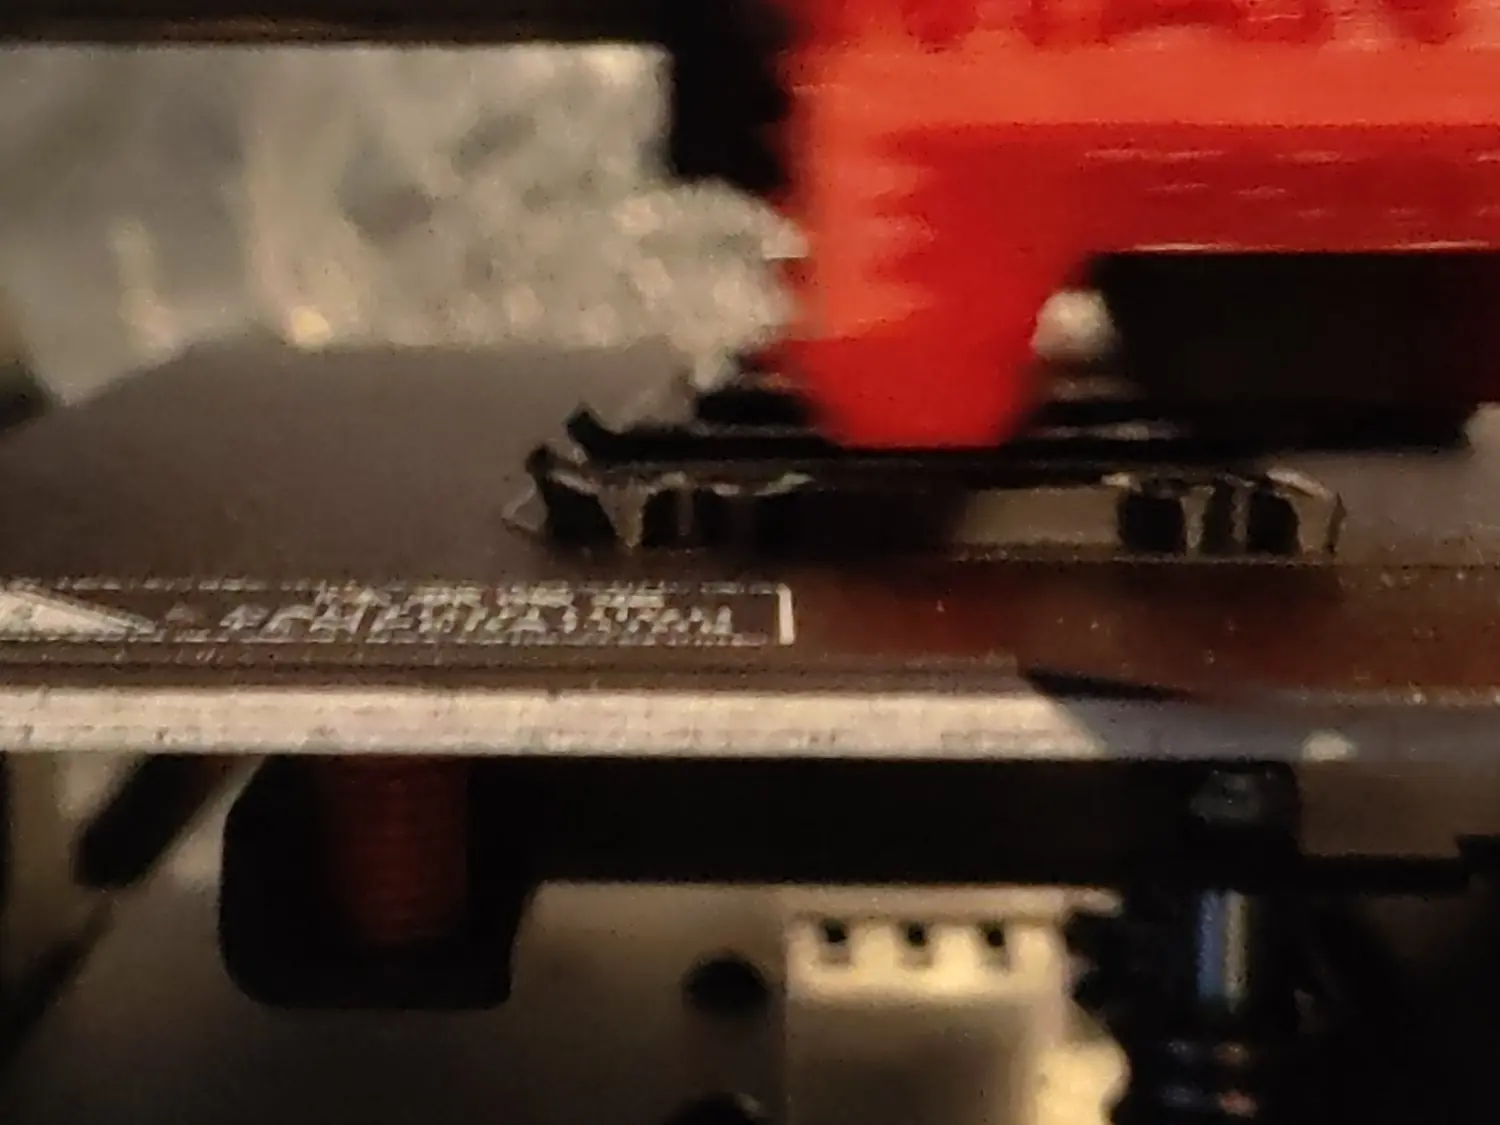
I've started printing parts for my voron 2.4, and it's generally going well enough. The parts are looking pretty decent. But I'm having a hard time getting good results with overhanging sharp corners. They tend to warp upwards as seen in the photo on the left side. The prints stick well enough to the build plate and I don't have any other warping or adhesion issues.

Is this because my cooling for overhangs is too much?

I generally print with no part cooling in an enclosure. Temps are 245ยฐC on the nozzle and 105ยฐC on the bed, using 60ยฐ fan speed for overhangs. I'm printing on a anycubic kobra 2 with azurefilm ASA.
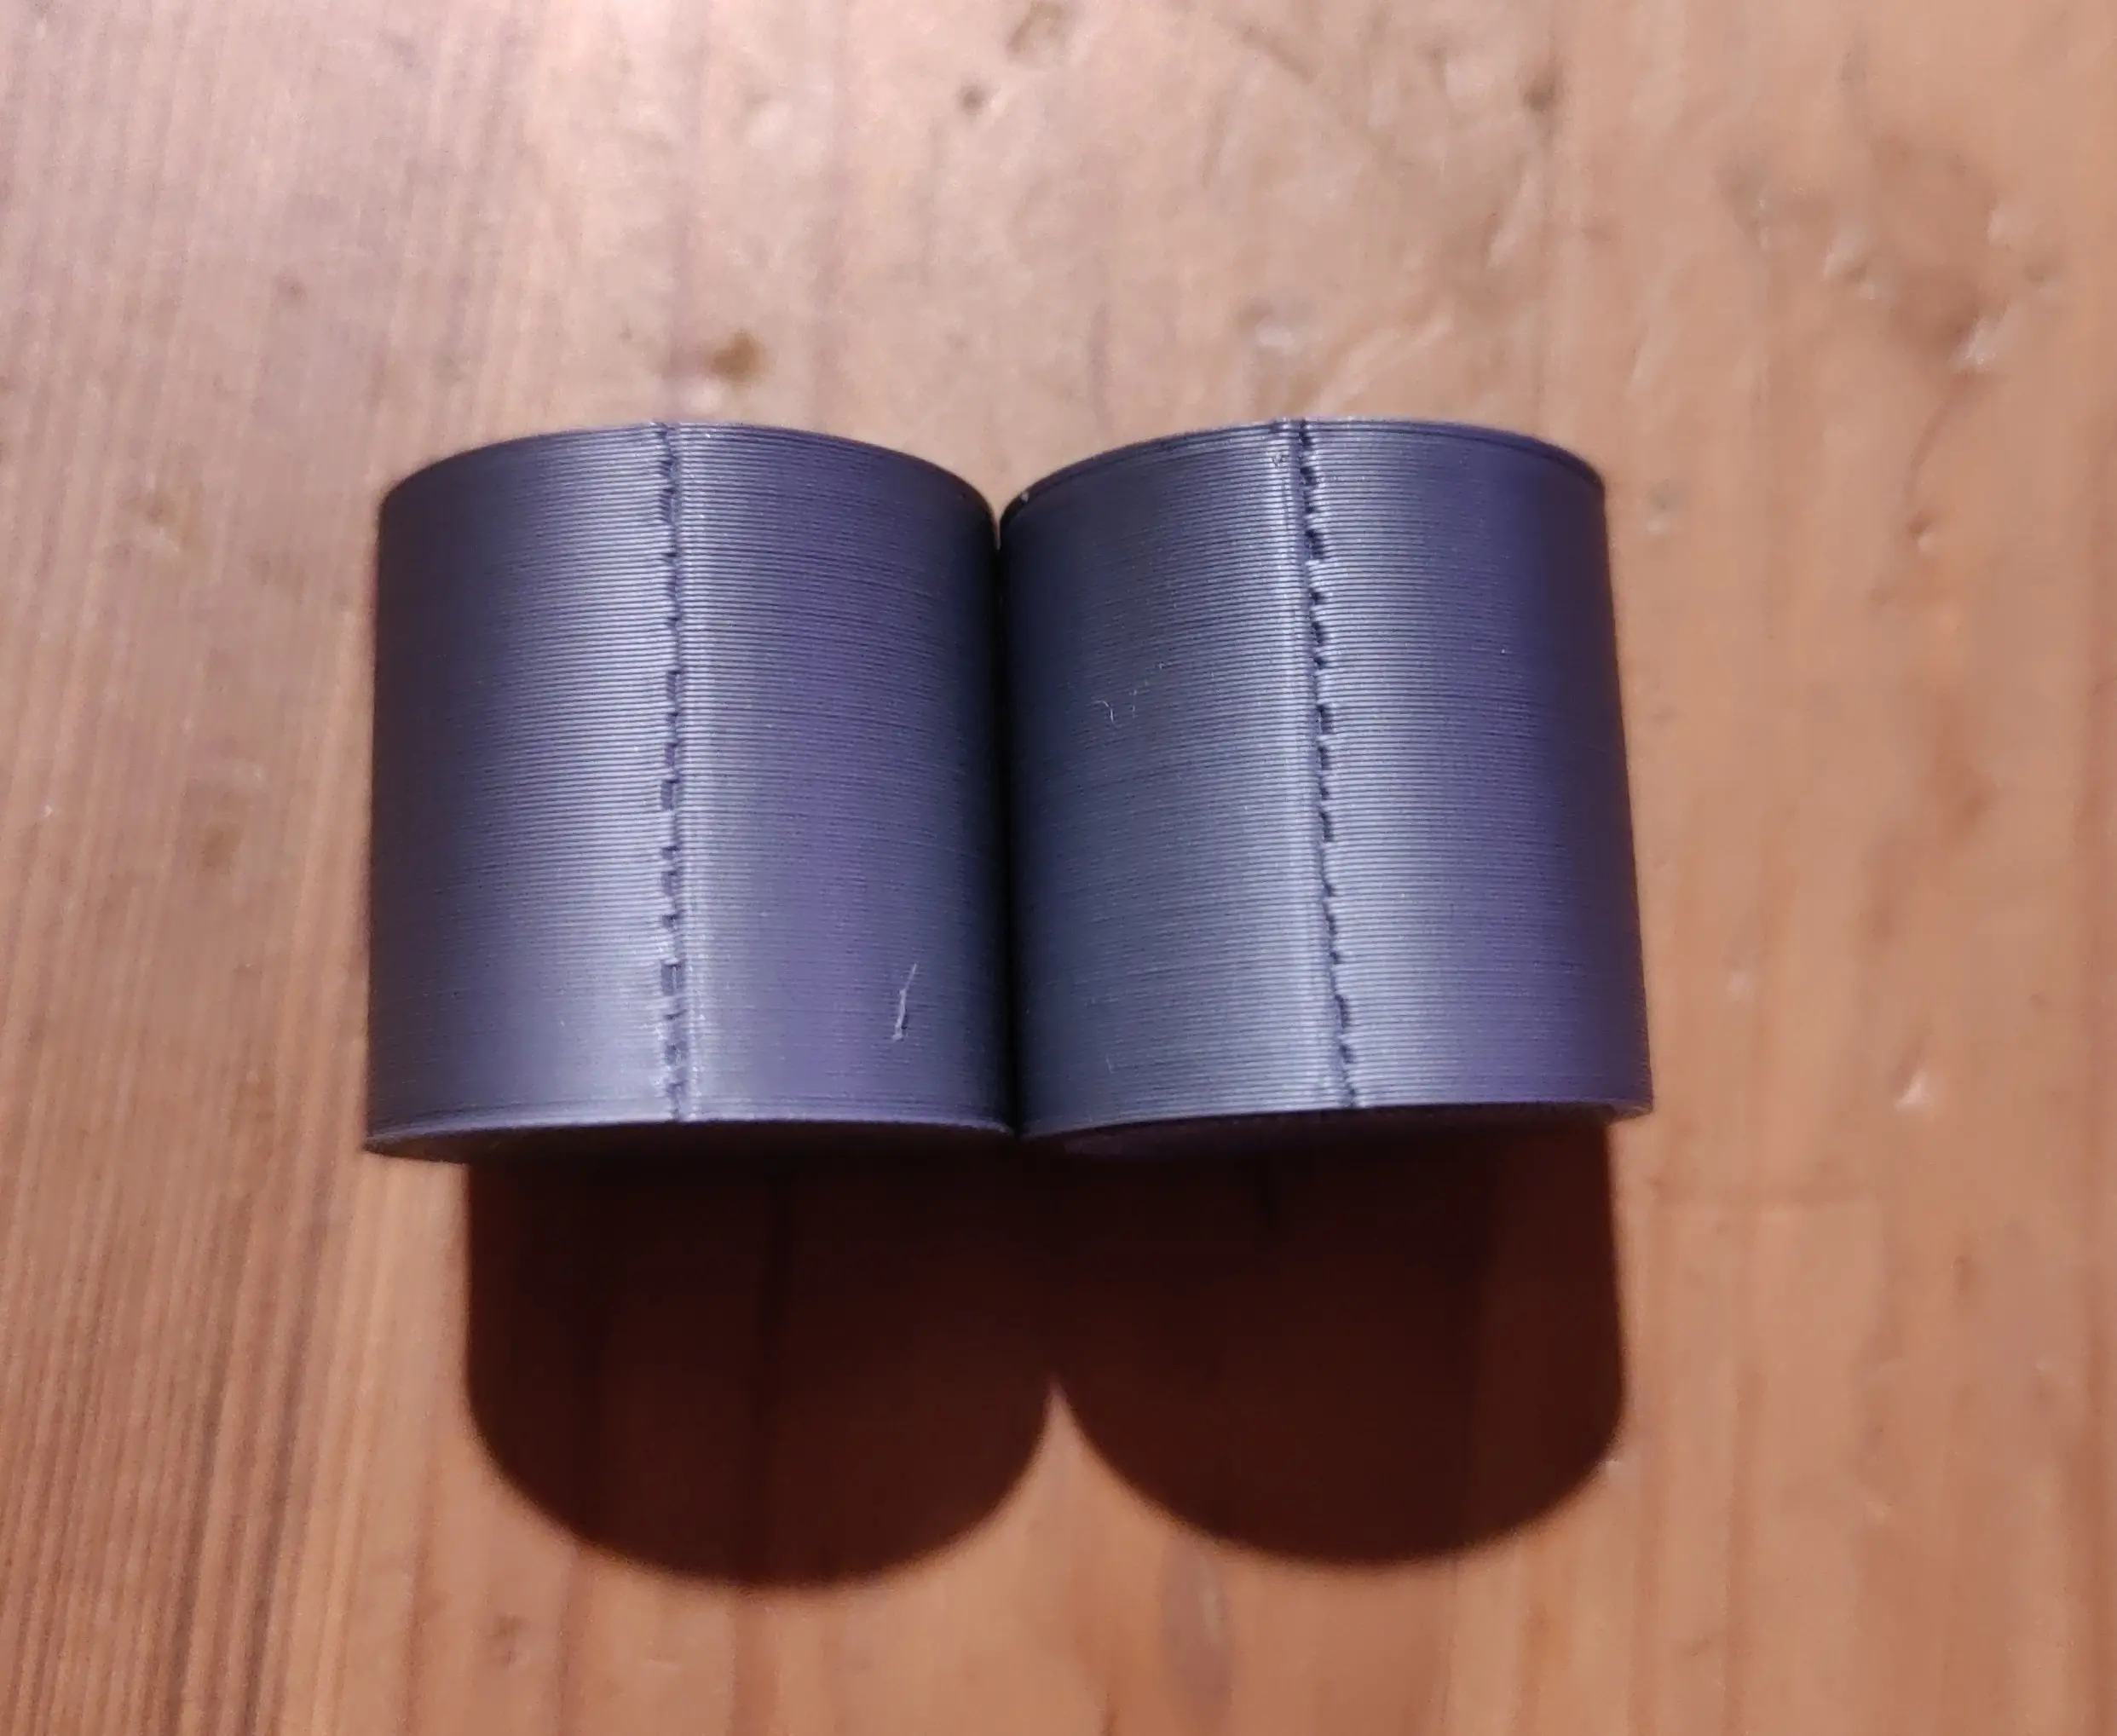
[โ€“] DreadPotato@sopuli.xyz 4 points 5 months ago* (last edited 5 months ago) (1 children)

Piped isn't working for me either anymore. I was using piped.adminforge.de before, but I've tried other instances too without any luck. It won't load play any videos at all. I can search and find stuff without issues, but I can't play anything.

[โ€“] DreadPotato@sopuli.xyz 2 points 5 months ago* (last edited 5 months ago) (1 children)

I just swipe left for "back" (android), and I can access everything just fine, it just closes the TOS. Just do that every time I open the app, works like a charm.

[โ€“] DreadPotato@sopuli.xyz 1 points 5 months ago (6 children)

No, its objectively insane behaviour...not to mention illegal (at least where I live). It's not only dangerous for you (that bike helmet isn't going to do shit to save you if you're hit by a car at >60mph), but you're creating a dangerous congestion because you're going way too slow for the flow of traffic. Please don't be an idiot and drive a bike on the highway, mopeds are not allowed there either (where I live)

[โ€“] DreadPotato@sopuli.xyz 6 points 5 months ago* (last edited 5 months ago) (9 children)

Yes they should have significantly better bike and pedestrian infrastructure

No, its not an excuse to behave like a fucking maniac and ride a bike on an expressway...That is an absolutely insane thing to do. Basically any other road is a better solution, even if it's means taking a less direct route. Not everything can be done in a beeline from A to B.

[โ€“] DreadPotato@sopuli.xyz 2 points 5 months ago

You're just making it ~~worse~~ better.

[โ€“] DreadPotato@sopuli.xyz 5 points 5 months ago

But then you don't want face-melting lasers.

Now hold on...I can see that being useful too. Two consecutive failed face IDs? BAM!!!* face melting laser on the (probably) unauthorized person trying to access your phone.

[โ€“] DreadPotato@sopuli.xyz 2 points 5 months ago* (last edited 5 months ago)

These watches typically come with charging cables, not a docking style station that you put them in. And keeping devices at a perpetual full charge for expended periods of time is a surefire way to kill the capacity quickly.


[SOLVED] Turns out I'm just a bigger moron than I thought. The MAC address of my server had accidentally been flagged in my router for black listing.

As the title says, my proxmox host is apparently not able to reach the internet anymore, not sure for how long this has been an issue, I rarely work on the host itself. It can ping other devices on my network just fine, and other devices can ping it. I can also SSH in to it and access the web interface. My VMs are connected to the internet without any issues. I don't need to access the host remotely/outside my home network, this is just for updating it etc.

I can't see the host under active devices in my router though.

I have been trying to figure why, but so far without any luck.


I have trouble fixing the terrible seams I'm getting. I've followed Elli's print tuning guide and calibrated extruder, tuned PA (it's now 0.035) and extrusion multiplier.

I've tried adjusting both retraction length and speed, but it doesn't seem to have much impact. I'm not using "wipe on retract" or "retract on layer change", I only retract if travel distance is longer than 3mm. Retract is 0.3mm @35mm/s.

I've tried reducing PA smooth time too, but this also doesn't seem to have a noticable impact.

I've tried reducing seam gap from the default 10% in Orca all the way down to 0%, but the bad seams persist.

I've tried with "wipe on loops" both disabled and enabled with no difference.

I've tried with both arachne and classic wall generator, no difference.

I've tried different wall orders, inner/outer, inner/outer/inner and outer/inner, all with the same bad seams.

Filament in the picture is matte PLA, it is without doubt dry and generally prints well aside from the seams. It's stored vacuum sealed with silica, and I use a filament dryer to dry if I suspect wet filament.

I'm running out of ideas for where to tweak to get a decent result.

11
submitted 7 months ago* (last edited 7 months ago) by DreadPotato@sopuli.xyz to c/3dprinting@lemmy.world
 

I've been contemplating switching the rods that my X and Y axis travel on to linear rails instead. The current hardware is double SS rods with SG15 bearings, with an eccentric nut to adjust tension on the rods.

Unfortunately these rods are not evenly spaced on my Y-axis. They're closer together at the back than at the front, deviating with 0.5mm. So the rollers are either too tight at the front, or too loose at the back, meaning the bed wobbles a bit when using the front of the bed, or skips layers due to higher resistance on the rollers when using the back of the bed. I could lower the movement speed, but I would rather fix the actual cause of the issue.

I have some suspicion that the rollers are also not rolling smoothly on the rods and sometimes slip/skip on them instead.

And then I came across the Voron switchwire and Ender3-to-switchwire conversions. Now I'm not really willing to fully rebuild the printer as a switchwire, but changing to linear rails on Y and X axes is not a massive rebuild and considerably cheaper. I would keep the existing threaded rods for the Z-axis.

I would use the hardware I have now (motors, pulleys, belts, bed-mount, belt tensioners) with minor modifications to accommodate the rails instead of the rods currently used.

Are there any caveats to be aware of when using linear rails?


I've been trying to print some things in TPU, using a fairly soft 85A TPU, and I keep having under extrusion.

I've already reduced speeds to max 25mm/s, and reduced retraction. My printer uses a direct drive extruder, and as far as I can tell, it's grabbing the filament just fine. I'm printing at 240ยฐC, using my default 0.4mm volcano CHT brass nozzle.

7
submitted 8 months ago* (last edited 8 months ago) by DreadPotato@sopuli.xyz to c/3dprinting@lemmy.world
 

I'm looking to expand my printer lineup, and have been looking at kits from magic phoenix for both the Voron Trident and the v2.4R2.

Is there any real benefit to one over the other, or is it more a preference thing?

Edit: if anyone know of other kits, preferably available in the EU, I would also like to take a look at those.

15
submitted 8 months ago* (last edited 8 months ago) by DreadPotato@sopuli.xyz to c/3dprinting@lemmy.world
 

I tried printing with PETG yesterday, and I noticed that it intermittently stops moving during the print for a few seconds. It doesn't throw an error or anything, just stops and then after a few seconds resumes as if nothing happened. But this creates huge blobs where it stops. It only happens when printing PETG, not PLA. Could this be caused by a filament setting in my slicer? I'm using prusa slicer. I inspected the gcode and there are no stops, pauses or color changes etc. in it. The behaviour happens both when printing from octoprint and directly from SD card.

Edit: these random intermittent stops are 10-20 seconds long, causing massive blobs from oozing filament.

Edit 2: so it seems to not actually be a PETG specific issue, but rather a model size/speed issue. I can get it running without stops if I just reduce print speed. When I crank speed to 100% I start getting these weird 10-20 second long stops.

So I'm overloading the controller with a lot of gcode commands in rapid succession? I'm running at slightly lower than manufacturer default Max.

SOLVED: the gcode resolution was set too fine, I increased it from 0.0125mm to 0.5mm as described here and the stuttering disappeared.

81
submitted 8 months ago* (last edited 8 months ago) by DreadPotato@sopuli.xyz to c/3dprinting@lemmy.world
 

Why are 3D printers still stuck on stepper motors? Why haven't we transitioned to servo motors with encoder feedback for positioning?

Is it just too cost prohibitive for the consumer-level? We would be able to print a lot faster and more accurately if we had position feedback on the axes. Instead we just rely blindly on the stepper not skipping any steps when we tell it to move, hoping for the best.

19
submitted 8 months ago* (last edited 8 months ago) by DreadPotato@sopuli.xyz to c/3dprinting@lemmy.world
 

I have run in to a strange issue where the X and Y axes don't move to the specified coordinate beyond a certain range.

The steps/unit are calibrated, when i tell an axis to move to position 100mm (using G0 or G1 command manually), it moves to position 100mm, this goes for both X and Y axis...but it seems like it hits a software-stop when i tell it to move beyond 225mm on both of them, which is weird since build plate is 230mmx230mm, and nozzle wipe-pad and Z-offset calibration are located at Y position 240mm-245mm.

The stepper just stops at 225mm even if i tell it to move beyond this point, and if i tell it to move back to 0mm, it positions itself correctly at the starting point. It doesn't sound like any skipping on the belt or the stepper itself is happening, it's completely silent but just stops. I can easily move the bed and print-head beyond this point by hand, and i can't feel any noticeable increased resistance in the movement.

The odd thing is, that this worked just fine a week ago, i haven't changed anything on the config of the printer. It's an anycubic Kobra 2 bedslinger.

EDIT: i can trick it to move beyond the 225mm point by changing the steps/unit, but that messes with the general print size accuracy.

EDIT 2: It seems a FW update enabled SW end-stops, a simple "M211 S0" command from the terminal disabled them again and now it works just fine.


I'm trying to calibrate linear advance on my anycubic kobra 2, using the guide in this video. I have calibrated my E-steps and flow rate for the extruder, and get the expected 100mm extrusion and expected wall thickness...so far, so good.

When i attempt the LA calibration to find my K value, i get the result shown in the image, with a serious deterioration of line quality when LA is enabled (K>0), and it seemingly gets worse as the K value increases.

I have used the tool from marlinfw.org to generate the g-code for testing K values.


I'm using an Anycubic Kobra 2 printer, it has a nice rubber pad at the back of the plate, which i assume is for wiping the nozze? However the printer profile Anycubic provides for prusa slicer doesn't use it at all, and actually has a fair amount of oozing because it heats the extruder first (which it then doesn't wipe away). So i decided i would add it myself. I'm completely new 3D printing, having only had the printer for a little over a week, so my solution may be a bit rough around the edges.

################ Start G-code with nozzle wipe and purge in back-left corner ################
G90                                        ; use absolute coordinates
M83                                        ; set extruder to relative mode
M140 S[first_layer_bed_temperature]        ; set bed temp
G28                                        ; home all axes
G1 Z2                                      ; raise nozzle to 2mm
G92 E0                                     ; reset extruder position
G1 X80 Y240 F1500                          ; position nozzle right next to wipe pad
M104 S[first_layer_temperature]            ; set extruder temp
M190 S[first_layer_bed_temperature]        ; wait for bed temp
M109 S[first_layer_temperature]            ; wait for extruder temp
G1 Z0                                      ; lower nozzle before wiping
G1 X90 F500                                ; wipe nozzle across pad in X direction
G1 Y235 F500                               ; wipe nozze in Y direction
G1 Z3                                      ; lift nozzle to 3mm
G1 X5 Y225 F3000                           ; move nozze to back-left corner of bed for purging
G1 Z0.28                                   ; lower nozzle to 0.28mm
G1 X45 E25 F500                            ; extrude 25mm of filament in a 40mm line
G92 E0                                     ; reset extruder position
G1 E-3 F3000                               ; quickly retract filament 3mm
G1 X90 F4000                               ; quickly move away from purge

The printer also end with the bed pulled all the way to the back, which I disliked since i would prefer it presented at the front for easy removal.

################ End G-code which presents the print for easy removal by pushing the bed fully forward ################
M104 S0                                    ; Extruder off 
M140 S0                                    ; Heatbed off 

G92 E0                                     ; reset extruder position
G1 E-5 F3000                               ; quickly retract filament 5mm
G91                                        ; use relative positioning
G1 Z1                                      ; lift nozzle 1mm
G28 X0 Y0                                  ; home X and Y axis
G1 X0 Y240 F3000                           ; move nozzle to the side and bed fully forward
M107                                       ; Fan off 
M84                                        ; disable stepper motors
 

How long do you have filament sitting "in the open"? I mostly print with a single filament roll at a time, and just leave it on the printer. A 1kg roll lasts me several weeks. For long time storage I keep it in an air tight box with disiccant pouches.

But how long can I let it sit before I should start storing it with disiccant and/or drying the filament before use?

view more: next โ€บ